MACERATORS AND OTHER SEWAGE INFORMATIONFirst, General RV sewage stuff (important info many people don't know). With an emphasis on proper venting, chemicals and more. We go to great lengths to avoid tank odors--and with good reason. All too often, though, we associate getting rid of odor with popping in chemicals. It's the American way. If something's offensive, painful, uncomfortable, just pop in a chemical or take a pill or pour in an additive. Feel depressed? Pop a pill. Engine pinging? Pour in a can of something. Toilet stink? Dump in some perfumed formaldehyde. Why not find the cause and try to fix it first? Once that's done, set up a good, renewable biological action in the tanks and avoid most of the problem in the first place. In the case of sewage tanks (black's usually the prime offender, but gray can be just as bad), poor venting is most often the cause. VENTING Gas from decomposing sewage is supposed to vent out through a pipe that goes from tank top through the roof. Using the black tank as an example when you "hit the pedal," the gas that was building up in the tank should vent out through the roof. Your momentary opening of the tank shouldn't allow enough "feedback" into the RV to be noticeable--unless the tank was nearly full or the end of the vent pipe was under water and the gas had no place else to go. Vent pipes need to penetrate the top of the tank, but only an inch or so. All too often, they are sloppily installed and, after only a few miles of travel, begin to slip further down into the tank. Many manufacturers only use a putty-like material to hold these pipes in place. Incredible, but true. To their credit, though, if the thing were glued in, you'd have a hellova time getting it apart. Even if the pipes don't slip, as described here, they often leak. In some cases, vent pipes are inserted down through the roof into the tank and just shoved on until they stop. (How much smarts do you expect from somebody who gets paid next to nothing for shoving a pipe in a hole?) In any case, if the end of the vent pipe is submerged, it won't vent. How do you determine where the end of yours is? Sometimes easily, sometimes with great difficulty. If you're lucky: Go to the roof, remove the cap on the vent and look for the end of the pipe. It should be nearly flush with the rooftop or a bit higher. This does not necessarily mean all is well (see below). If it's way down there someplace, or you can't even see it, it probably just slipped. If you then go into the RV and to the back of the closet (or wherever they hid it), you might be able to grasp and twist and raise it. Don't do this too hastily. If you pull it all the way out, you can have a job getting it back in. If it's where it's supposed to be in relation to the rooftop, you might have an extra-long pipe (poor you). If you're not lucky: You need to determine where the end of the pipe really is. Sometimes, if you have polyethylene tanks, the kind that are translucent, you can shine a very bright light against them and, looking through the opposite or side end of the tank, see the shadow of the usually black ABS-type pipe. If so, you lucked out and can adjust it. Some RVs, usually the newer ones, have tanks that are literally buried, and you can't do much of the above. You'll then need to disassemble or cut your way to the vicinity of where the vent pipe enters (poor you). REBUILDING AND REHANGING TANKS AND CONNECTIONS Look at this as a positive exercise, though. You need to know how to get there because someday the thing will probably leak, and you'll have to do this anyway. Two of my RVs have had improperly inserted vent pipes. Many do. My solution was not to fool around with all the above in the hope I'd get lucky. I rebuilt the things. I located the point of entry of vent pipes, partially removed them by pulling up through the roof, dropped the tanks, inserted gasketed fittings (see below) and reassembled the whole business. While I was at it, I hung the tanks properly. Manufacturers do a lot of cheap stuff. They hang tanks, or shove them in a compartment, with no regard for friction or wear (because by the time the hangers grind their way through the tank and create leaks, you'll likely have traded it and they won't have to honor a warranty). When I reinstalled my tanks, I used foam (computer mouse pad pieces) to prevent rubbing at the hangars. I used gasketed fittings to connect vent pipes. These things don't cost very much. Available in better RV and building supply stores, they're kind of like the compression fittings used on water lines--plastic, screw-on, with a neoprene insert. You shove one end into an appropriate-size hole in the tank, stick the end of the vent pipe in the other and down in the tank (just enough) and start twisting the knurled nut until it's snug. It's harder to describe than to do. You'll have a leak-proof fitting that you can always disassemble, that will flex as the RV vibrates and prevent future problems. Many variations are available, some have part of the fitting cemented to the tank, but have similar neoprene twist gaskets that the pipe goes through to allow the same disassembly and flexing. Shop around. Tank heaters. Along with the above, while you're doing this job, consider installing tank heating pads and heated cable on your outlet valve pipes. Not cheap, but not expensive either. You can buy the pads and cable in lots of places. An easy one is any RV dealer who has the "Coast Distribution" catalog. Most RV stores use "Coast Connection" (a.k.a "Coast Distribution System")--not to be confused with "Coast-to-Coast" RV parks. Tank heating pads will usually be both 12VDC and 120VAC. They don't use much electricity. If you're parked with a hookup, no big deal. If driving, no big deal either. You can get cheap "household" heater cable in building supply stores. Usually, it's 120VAC only. Not too swell. Some stores have 120VAC/12VDC combination cable; look for it. Mine is sheathed in stainless-steel loom and can be cut to size. Very nice. My tanks hang under the RV. Some people have them in basements and don't need all of this. But consider. Is the basement heated? If not, you might need pad and cable heaters. If heated, then by what? Many newer RVs brag of furnace heat to basement as well as living quarters. Do you want that? Think about it. How much LP and 12VDC do you want to waste in the basement? On the other hand you might need it. Grey tanks won't smell as bad as black if there's a problem, but can still really stink. Worse, while the black is under the bathroom (where you can slam the door and escape), the gray gas usually escapes into the living area. Grey gas doesn't smell like you-know-what, but more like somebody threw up or like a mouse died. Familiar? With black, the toilet evacuates directly into tank with no trap in between, thus the abrupt attack on your nose if something's wrong. Gray is more subtle. The "P" traps under your bath tub/sink(s) should retain enough water to provide a barrier to gas. However, if the vent is blocked, as with black, the water in the P trap can be siphoned into the tank or, in extreme cases, blown back into the sink. In either case, no more barrier and the escaping gas makes you wonder if there's a dead rat under the bed. Treat gray venting the same way as black. P trap water will evaporate in time also which you should consider if your RV is in storage for long periods. "Back vents" or "Air-Lock Vents" can cause the same problems as the above. Essentially, these are one-way air valves (that let air into the vent system, but not back out into the living area). They were developed for certain, specific conditions in homes when people wanted to add a sink but didn't want to get involved in the major construction and expense of running vent pipe through walls and up through the roof. These are very restricted by building codes and must be quite close to the existing vent system. Some RV manufacturers use these as cheap alternatives to real vents. Some work, some don't. These things use a simple vinyl flapper as the check valve and can easily fail. In an RV, with one of these under the kitchen cabinet, in a closet or similar place, they can create a real stinky problem. Look for these if you have smelly problems. Okay, I've saved the best for last! None of the above may be your problem! You might be your own enemy. RV SEWAGE -- It's More Than Just the Smell Are you a "tidy Tilly" who's an obsessive cleaner-upper?
Do you commonly use extremely caustic cleaners in toilet and
sinks? Dump nasty stuff like paint thinner in there? Use formaldehyde
toilet chemicals -- or other perfuming stuff? In short, do you
treat your RV tanks like you did your house on a municipal system
where any possible thing was just RV waste systems depend on bacteria to decompose waste, including toilet paper and anything else that's biodegradable. But there's bacteria -- and then there's bacteria. "Aerobic" bacteria need oxygen (air) to live. These "good" bacteria decompose waste efficiently. Ideally, a tank with waste, water, and simple biodegradables will decompose into a thin slurry and will not smell. Ample air enters each time the toilet is used. If the vent pipe is properly placed through the top of the tank and isn't submerged so far down that it's blocked most of the time, and if the pipe isn't blocked elsewhere or at the roof, the system should work fine. "Anaerobic" bacteria live without oxygen. They will also decompose waste, but in doing so produce various gases. Those gases also produce "STINK." Obviously, the two types of bacteria can't coexist. One will always displace the other. Proper venting helps keep the aerobic bacteria active, but there's more to it. Putting the wrong additives or chemicals in a tank may result in killing BOTH types of bacteria, then you really have problems. Your mission, Mr. RVer, should you choose to accept it, is to encourage aerobic bacteria and discourage anaerobic bacteria without turning the tank into a receptacle for destructive chemicals. There are generally three ways to treat waste tanks: Chemicals, Enzymes and Bacteria. CHEMICALS are absolutely the worst way to do it;
yet that's what most RVers use. Store shelves are jammed with
chemical treatments. The first thing they do is kill bacteria
-- which is exactly what you DON'T want to do. Then, they use
a chemical to "break up" the solids into progressively
smaller pieces that accumulate on the bottom of the tank in a
big pile of crud instead of decomposing. The tank will stink,
so then they have chemicals that overpower the natural (bad)
odor with yet another odor. Some other things you definitely don't want to put in your tank individually or as part of chemical treatments: Bleach, methanol or alcohol, nitrites or nitrates, phosphorous or phosphates, bronopol (a pesticide) or any petroleum-based product, acid or cleaning fluid. More no-no's listed separately because so many RVers use them in home-made concoctions: Pine oil (which deteriorates gaskets if used in large amounts), automatic dishwasher detergent (extremely caustic), mineral, coconut or cooking oils (which won't really "lubricate" valves and seals but will just float on the surface and keep air from getting to the good bacteria), yeast (which will promote bacteria, but so much so you'll have a tank full of goo). ENZYMES won't do any harm, but won't do all that needs to be done either. They will do pretty well with an odor, but just for a short time. Enzymes can help sometimes and are often included in good bacterial treatments. Active BACTERIA will do the job. A properly set up and maintained system won't need much either. As opposed to chemicals (where more and more must be used with less and less effect), when adding bacteria "less is better." It's important that you follow the instructions. You must start with a clean tank (or residual chemicals will defeat the action). You need to start the tank with a few gallons of water. You shouldn't add the bacteria until there's a deposit of human waste in there. If you do it right, it will take about three, in normal use, dumps before you have a good, renewable system. You can then keep it going with only small additions of bacteria every other dump or even fewer. I lived on a boat once. Prominently displayed over the john was a poster saying, "Don't put it in here if it ain't been et yet." Well, it's not that critical, but a good colony of bacteria will eat lots of stuff and not smell bad if you don't kill the bacteria. WHICH BACTERIAL AGENTS ARE THE BEST? There are several good ones. Homeowner septic tank chemicals work. They're readily available in most supermarkets and cheap. They are not fast working, which is why RVers are sometimes dissatisfied with them, but they were designed for thousands of gallons and a lot of time, not the short time demanded by the 40-100 gallons in most RVs. "Rid-X" is the best of these. "Roebic" (www.roebic.com)
and "K.O." (in boating stores) are excellent holding
tank bacterials. I'm also impressed by "Mean Green"
(800) 999-2847 for info. "Pure Power" in RV stores
or call (800) 411-8801 for info is very excellent. In a lengthy
"head-to-head" (pun intended) test against "Eco-Save,"
results were almost identical. BE VERY LEERY OF: BE VERY LEERY OF: Finally, the inclination of most RVers is to use toxic chemicals
and not worry about it. The attitude is "The dump station
or RV park will handle it." Not so. The EPA is getting very
strict. At present, their rules state that if a system causes
contamination, the park or dump station "may"
be forced to close. I'm reliably informed that the new EPA rule
will state that if contamination is detected, they "WILL"
be forced to close. Purging a sewage system of contaminants is complicated and expensive. That cost is going to be passed on to the RVer. It's a necessity and it doesn't necessarily mean the RV park operator is greedy. Operators of courtesy-type dump stations at rest areas and similar places have solved the problem the easy way -- they're closing many of them. Most of the problems RVers face can be blamed on the manufacturers. This one can't. The enemy is us. HOW TO CLEAN SEWAGE TANKS -- Lengthy process but really easy. First, dump and flush as normal -- no detergents and PLENTY
of water. Once that's done, close dump valve and remove slinky.
Then open dump valve and more residue will come out. (Do this
at home or somewhere there's no audience.) Use your garden hose
to spray the "stuff" at valve and open end of tank.
Finally, spray all the poop on the ground and the Now comes the easy part. Pour about a quarter cup of
ordinary dishwashing detergent in the tank (NON anti-bacterial
version), "Dawn" or "Joy" are best. Then
pour in about two gal of water. Drive RV to nearest market. Get
about two or three bags of ice cubes and pour them in tank. Then
drive to RV park or similar -- make a holiday of it -- (about
a two Routine future dumping should include simple flushing with water and no detergents (unless doing the whole process all over again). You want to keep a residue of the good bio going. (Kind of like a sourdough starter.) Do all this properly, adjusting amount of bio through experience, and you should be trouble free. In my case, as an example: With a 40 gal tank, using "Eco-Save," I put in only one (liquid) capful or one tablespoon of dry version every-other dump (or more) and am odor free and don't have any "floaters" in the tank. Here's one that screws people up. Often, especially in motor homes, the bathroom, and black tank, are behind the rear axle(s) and the kitchen, and gray tank, in front of the rear axles. So, where does the gray water from shower and bathroom sink go? In most cases, it drains into the Black tank (a cheap and EZ solution for the RV manufacturer). Many RVers don't realize this and wonder why the Black tank fills up so fast. Actually though, it's not a bad situation. More frequent dumping is required, but the bathroom gray water added to the black tank "thins out" the black goop. Reasonable amounts of soap/detergents/shampoo (of the right kind) don't interfere with the bacterial action. RVers with this setup often have very few el-stinko problems if venting and such are OK -- and the RVer knows about it. FLUSHING WITH GRAY WATER -- For those who know what they're
doing: * I used gray water for flushing on boats (and later in travel
trailer). In RV, used a variety of pumps. Old style RV pump, (big diaphragm
in can with exterior motor on top turning eccentric arm) worked
best. Was bought at flea market for next to nothing. Had pressure
switch, so just had to run water line to toilet area and manual
switch to any convenient place (near fresh water pump switch
so was easily reminded to turn them off when leaving RV). In
use at toilet, just had to point sprayer and squeeze trigger. REMINDERS AND ODDS AND ENDS * Various pumps: The old timer mentioned above is reliable and easy to repair. I have also used a macerator for this (since I had an extra). I've seen people use rotary drill pumps (that cost as little as $4 but wear out early). About 10 years ago, you could easily find a "tiny" macerator in surplus stores. These cost about $15 and were from some ill-advised venture that incorporated them into the bottom of some camper or marine toilet. If you find one, they work great (I had one). There are all sorts of fountain pumps, trash pumps and similar. Best way to view the variety available is check the "W.W. Grainger" catalog available at about any hardware store. Check Yellow Pages for things like Industrial Supplies, Surplus, Salvage, etc. * The odd fittings I mentioned aren't really odd. Good RV stores will have them in bins and you can just poke around and find them. Camping World has them, but you have to go to the special parts counter and try to explain what you want to some numb nut -- not much fun. * Deck hatches are good for lots of things. I have one on top of my fresh water tank. Above the low-end output, it allows me to clean the bottom of the tank (that always holds an inch of water and crud when drained). I have another through the floor directly above the 65 gal fuel tank. By carefully measuring, I got it directly above the fuel pump/pick up/gauge unit that drops down into the tank. (Why drain and drop a tank if you don't have to?) SIMPLE SEWAGE TRICKS • Keep jars with screw-top caps for disposing of things like cooking grease, alcohol, paint thinner, etc. • Don't use colored, double thickness, perfumed, household toilet paper because it just makes sludge and doesn't biodegrade fast enough. But don't bother with RV toilet paper that costs too much either. Generic, single-layer, el-cheapo toilet paper is the same thing as RV paper and lots cheaper. Better, in my opinion, is "Scott" brand single-ply, white, unscented toilet tissue sold in supermarkets in 1,000 sheet rolls. With these, you won't have to bother with the TP-in-a-plastic-bag ploy as some RVers do (unless you feel like it). • Again, paint the exposed plastic pipe and fittings under your RV. Ultra-Violet (UV) from sunshine deteriorates plastic and is the reason for so many broken RV pipes and fittings. • Supervise children and visitors! Kids will throw anything into the toilet just to see where it goes (and they'll hold the pedal down an hour to do so and you'll wonder why you ran out of fresh water and wonder why you have to dump after a one-day drive). Non-RVer visitors will throw diapers, sanitary napkins, cigarette butts, apple cores, peach pits, facial tissue--(you name it) in your john without ever thinking about it--just like they do at home. • Read the label on cleaning agents. Don't use caustics; use biodegradables. Baking soda (or Bon-Ami) is every bit as good a cleanser as the poisonous stuff. • Baking soda is also an excellent drain cleaner. Pour a cup into sink/bath drains at night (just before bed), pour a cup of water on it (just enough to get it down in the P trap), leave it 'till morning. You don't have to flush it away with copious amounts of water either. It won't hurt a thing. • Remove your black and gray sewer caps once in a while. Clean them and put a very thin coat of grease on the "O" ring seals and you won't be dribbling sewage all over the country (or next to your neighbor). "Plumbers Heat-Pruf" grease is best, but "white" grease is good too. "Vaseline" works but tends to get sticky. • A piece of wire coat hanger a foot or so long with about ½" at the end bent 90º is a good tool for cleaning the "slots" in slider valves and some toilet valves. (Don't drop the thing in the toilet!) • Don't ever stick anything down in the toilet bowl unless you have a string tied to it! The retrieving of brushes, flashlights, etc., from the black tank is called "diving for pearls" -- but it ain't near as much fun. • Use all the water saving tricks when out in the boonies, but, when on a full hookup, use water lavishly (just for a time, not forever). You'll have nice, clean tanks and hoses. But don't use someone's full hookup as a place to dump poison into their septic tank. • A good way to get rid of black water. Use your macerator to pump it into old milk-type jugs. Pack them in a box. Gift wrap the box and leave it in the back of your pick-up at a mall. Someone will steal it. (Works for garbage too.) • Think about what you're doing when playing with poop. Screw up many of the above, especially screwing up with the macerator (below), done when you're half potted or distracted by BS-ing with your neighbor, will end up with your neighbors in hysterics and you with 40 gallons of poop on your shoes. |
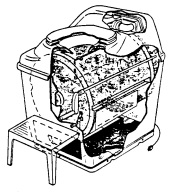
MACERATORS: Macerator pumps provide a partial answer to sewage disposal, chopping waste into a thin slurry and pumping it out through a garden hose to a proper disposal. And that's all there is to it. They're not magic and they're not maintenance free. They can, though, eliminate the most onerous part of the dumping chore if used properly. Most RVers use macerators in a temporary fashion and only when a full hookup is unavailable. In doing so, they miss out on some of the real benefits of a macerator. Temporary hookups involve adapting a macerator to an RV sewage outlet and attaching/reattaching it just as you would a "slinky" sewer hose. While this allows pumping sewage long distances and into otherwise unavailable receptacles, like septic tanks, plumbing cleanouts, sewers, or toilets, it also requires handling something even more clumsy (and prone to spilling) than a regular slinky. Storage and electrical connections (macerators demand hefty wiring) can also be a problem in this case. (See later for pointers on using a "temporarily" connected macerator. Many of us have found that installing a macerator in a semi-permanent fashion is a far better way. Semi-permanence means that it can be used without attaching and disconnecting and it can be bypassed with valves and can be easily removed for maintenance. Carefully installed, a macerator can be used full-time with only a flick of the wrist and nary a drop of spillage. Because of the variety of plumbing layouts in RVs, it's impossible to show a specific arrangement of fittings. The drawing at Figure 1 shows a typical RV waste tank and valve arrangement modified to accept a semi-permanently mounted macerator. If you're fortunate, you'll have just such a straightforward, squared-off arrangement. Some RVs have lines that come together at angles or other odd-ball configurations. In these cases, it's a matter of planning the layout to use angled fittings, squeezing things in the space available, and using branches from the main line rather than the simple in-between arrangement shown. 
|